
My First Arduino Project: Ethernet Enabled Voltmeter for Solar Batteries
12.73v
12.73v
12.73v
12.73v
12.73v

HTTP/1.1 200 OK
Date: Sun, 15 Apr 2012 10:44:03 GMT
Content-Type: text/plain; charset=utf-8
Connection: close
X-Pachube-Logging-Key: logging.PlG0hXDwYXVgUyvba56H
X-PachubeRequestId: a0b4fdf5d12e25345228f17ad9d2f7ba145601ea
Cache-Control: max-age=0
Content-Length: 1
Age: 0
Vary: Accept-Encoding
If you're wondering what this is all about, well this is the output in the Serial Monitor from my first Arduino Uno sketch, written specifically to capture voltage and post to the Pachube data logging / publishing website.
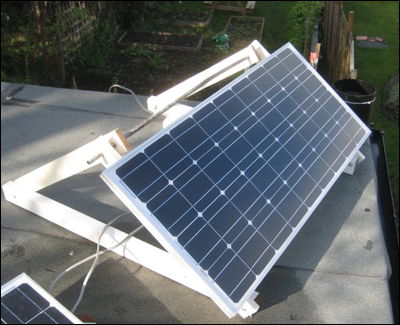
I have recently become very involved in powering my workshop solely from Solar energy. I have a 12V panel sitting on the roof angled at 38 degrees facing due South, connected to a Solar Charge controller and 4x 125Ah Deep Cycle batteries.
 I wanted some way of being able to measure the state of charge of the batteries and have this data logged over time and be accessible across the internet.
Months earlier I had bought an Arduino Uno and Ethernet Shield but hadn't given either much attention, I'd not even written a sketch before and had only read about the possible projects these little microprocessor devices could fulfill.
The hardest task was in writing the software, but luckily I had found two sites on the Internet where I could combine and edit the code to suit my purpose.
One sketch activated the Ethernet Shield and posted data to Pachube whilst the other sketch calculated voltage using a voltage divider with its input on the analog pin 0.
Here is the working sketch.
/* Pachube sensor client This sketch connects an analog sensor to Pachube (http://www.pachube.com) using a Wiznet Ethernet shield. You can use the Arduino Ethernet shield, or the Adafruit Ethernet shield, either one will work, as long as it's got a Wiznet Ethernet module on board. This example has been updated to use version 2.0 of the Pachube.com API. To make it work, create a feed with a datastream, and give it the ID sensor1. Or change the code below to match your feed. Circuit: * Analog sensor attached to analog in 0 * Ethernet shield attached to pins 10, 11, 12, 13 created 15 April 2012 updated 19 April 2012 by Jonathan Furness http://arduino.cc/en/Tutorial/PachubeClient This code is in the public domain. */ #include#include #define APIKEY "INSERT YOUR API KEY HERE" // replace your pachube api key here #define FEEDID FEED ID HERE // replace your feed ID #define USERAGENT "Arduino" // user agent is the project name int batMonPin = 0; // input pin for the divider int val = 0; // variable for the A/D value float pinVoltage = 0; // variable to hold the calculated voltage float batteryVoltage = 0; float ratio = 3.99; // Change this to match the MEASURED ration of the circuit // assign a MAC address for the ethernet controller. // Newer Ethernet shields have a MAC address printed on a sticker on the shield // fill in your address here: byte mac[] = { 0xDE, 0xAD, 0xBE, 0xEF, 0xFE, 0xED}; // fill in an available IP address on your network here, // for manual configuration: IPAddress ip(192,168,1,70); // initialize the library instance: EthernetClient client; // if you don't want to use DNS (and reduce your sketch size) // use the numeric IP instead of the name for the server: IPAddress server(216,52,233,122); // numeric IP for api.pachube.com //char server[] = "api.pachube.com"; // name address for pachube API unsigned long lastConnectionTime = 0; // last time you connected to the server, in milliseconds boolean lastConnected = false; // state of the connection last time through the main loop const unsigned long postingInterval = 10*1000; //delay between updates to Pachube.com void setup() { // start serial port: Serial.begin(9600); // start the Ethernet connection: if (Ethernet.begin(mac) == 0) { Serial.println("Failed to configure Ethernet using DHCP"); // DHCP failed, so use a fixed IP address: Ethernet.begin(mac, ip); } } void loop() { // read the analog sensor: // int sensorReading = analogRead(A0); // if there's incoming data from the net connection. // send it out the serial port. This is for debugging // purposes only: if (client.available()) { char c = client.read(); Serial.print(c); } // if there's no net connection, but there was one last time // through the loop, then stop the client: if (!client.connected() && lastConnected) { Serial.println(); Serial.println("disconnecting."); client.stop(); } // if you're not connected, and ten seconds have passed since // your last connection, then connect again and send data: if(!client.connected() && (millis() - lastConnectionTime > postingInterval)) { sendData(batteryVoltage); } // store the state of the connection for next time through // the loop: lastConnected = client.connected(); { val = analogRead(batMonPin); // read the voltage on the divider pinVoltage = val * 0.00488; // Calculate the voltage on the A/D pin // A reading of 1 for the A/D = 0.0048mV // if we multiply the A/D reading by 0.00488 then // we get the voltage on the pin. batteryVoltage = pinVoltage * ratio; // Use the ratio calculated for the voltage divider // to calculate the battery voltage // Serial.print("Voltage: "); // Serial.println(batteryVoltage); //delay(1000); // Slow it down } } // this method makes a HTTP connection to the server: void sendData(int thisData) { // if there's a successful connection: if (client.connect(server, 80)) { Serial.println("connecting..."); // send the HTTP PUT request: client.print("PUT /v2/feeds/"); client.print(FEEDID); client.println(".csv HTTP/1.1"); client.println("Host: api.pachube.com"); client.print("X-PachubeApiKey: "); client.println(APIKEY); client.print("User-Agent: "); client.println(USERAGENT); client.print("Content-Length: "); // calculate the length of the sensor reading in bytes: // 8 bytes for "sensor1," + number of digits of the data: int thisLength = 9 + 5; client.println(thisLength); // last pieces of the HTTP PUT request: client.println("Content-Type: text/csv"); client.println("Connection: close"); client.println(); // here's the actual content of the PUT request: client.print("voltage1,"); client.println(batteryVoltage); // Serial.println(thisLength); Serial.println(batteryVoltage); } else { // if you couldn't make a connection: Serial.println("connection failed"); Serial.println(); Serial.println("disconnecting."); client.stop(); } // note the time that the connection was made or attempted: lastConnectionTime = millis(); }
Last Sunday, the Arduino Uno with piggybacked Ethernet Shield began posting reliable data to the Pachube website. Here are the LIVE graphs produced from this project.


Comments
Leeroyd
5 September 2012 - 9:08am
Permalink
Analaog Sensor
Hi there,
Which voltage(analog sensor) did you use to measure the voltage on the battery?
Kind Regards
Lee
Kirill
19 February 2013 - 2:02am
Permalink
KSduino
May be you will be interesting to look at KSduino project: http://ksduino.org
So Welcome! :-)
Kirill.
Add new comment